

Adobe re-built the guided edit mode from the ground up in version 14. In Photoshop Elements 15 Adobe has continued this development, adding several new features.
ELEMENTS EDITOR
Effect Collage
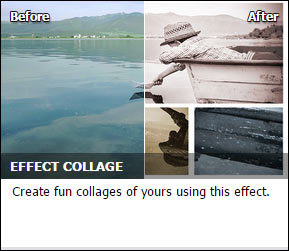
The Effect Collage Guided Edit helps you apply effects to
different sections of your photograph. Take a regular image and apply multiple
effects to it to make an eye-popping piece of contemporary art.
Find this guided edit in Guided >> Fun Edits >> Effect Collage
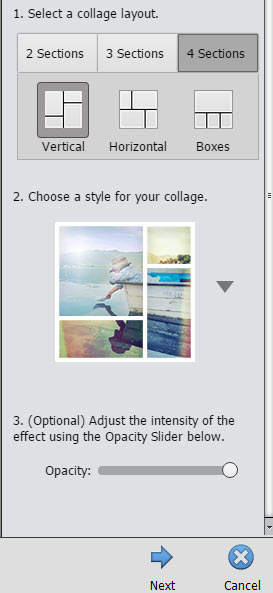
1 With a photo open, in Guided mode, under the Fun edits tab,
select Effect Collage.
2 Select a layout. Choose from a total of 9 different layouts
-3 layouts in each of the sections.
3 From the drop-down selections, choose an effect to be applied
to the collage.
4 (Optional) Use the Intensity slider to vary the
opacity of the applied effect.
For best results, perform steps 3 and 4 repeatedly until you
get the right look. See example (before & after) below,
 |
| Before After 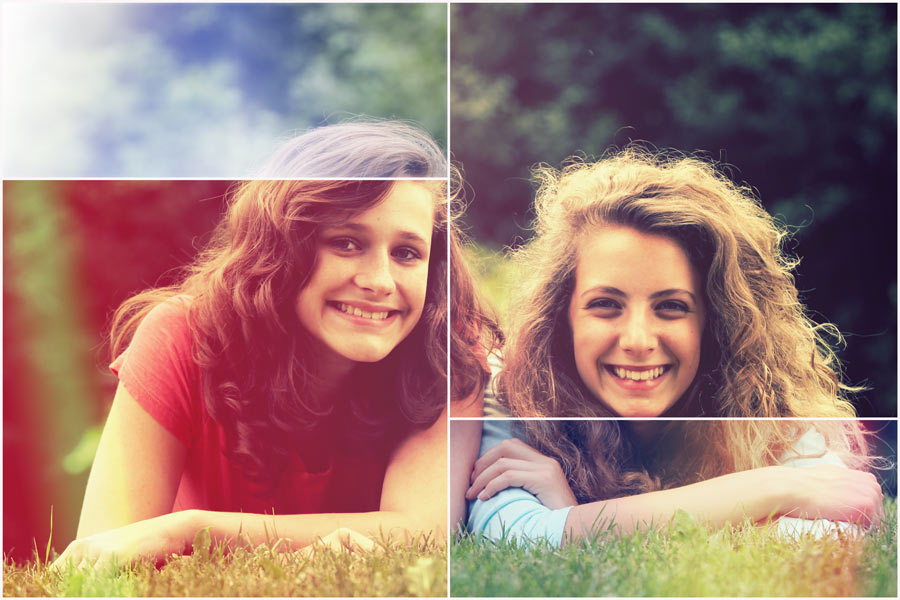 |
 |
| Before |
After

Painterly

Painterly is a way to create artistic output by painting
your photo with a brush on different textured canvasses and applying different
painting effects.
Find this guided edit in Guided >> Fun Edits >> Painterly
1 With a photo open, in Guided mode, under the Fun edits
section, select Painterly.
2 Click the Paint Brush button to automatically paint the
main subject of the photo with an artistic surface. A special set of brushes is
available to paint the main subject of the image.
3 Select a background color for the canvas. Click Black or
White to pick those colors. Or, click Select Custom Color to use the color
picker and choose a color that blends or provides better contrast with the
picture.
4. (Optional) Click Texture to choose an appropriate
texture for your picture.
5. (Optional) Click Effect to apply a painting effect
to your picture.
Click the next button to save or go into Expert mode to add
extra brush strokes and flourishes. See sample below.

Photo Text
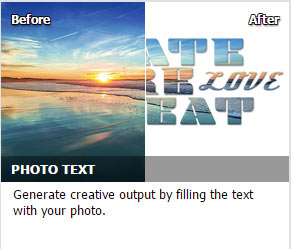
Create text with a stenciled appearance with one of your
photos as the background fill.
Find this guided edit in Guided >> Fun Edits >> Photo Text
1 In Guided mode, open your image and click the Fun edits
tab and select Photo Text.
2 Click the T tool button and type your text on the photo
3 Choose how you want to adjust the text on the image (Fit
or Fill)
4 Select a background style (Black, White, or Clear)
5 Crop the image to the text using the Crop tool.
6 Click Small, Medium, or Large, to adjust the type and
intensity of the bevel, drop shadow, or stroke that is applied to the text.
Tip: Click the Advanced button if you want more
control over the bevel, stroke and drop shadow.
Your output could look something like this.
Samples:


Speed Pan
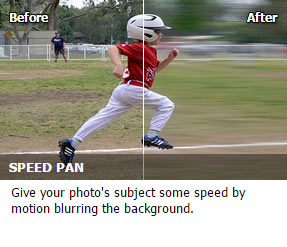
The Speed Panning feature is a great way to add a sense of
motion to your subject by blurring the background. The direction of the motion
blur and intensity can be adjusted to give impact.
Find this feature in Guided >> Fun Edits >> Speed Pan
1 Open an image.
2 In Guided mode, click Fun Edits > Speed Pan.
3 Click the Quick Selection tool, and draw your selection
around the subject of your photo. Your options:
-Use the Brush Size slider to change brush size.
-Use the Add or Subtract buttons to vary the selected
portions of your photo.
4 Click Add Panning Blur to apply the speed panning effect.
Your options:
Use the slider to change the intensity of the effect.
Use the Angle control to set the angular direction of the
motion blur. This angle is typically the direction in which your subject is
moving.
5. (Optional)
To remove any excess blur, click Fine Tune Blur, and then drag the pointer over
the area that you want to remove excess blur from.
Sample |
| Before |
After

Frame Creator

You can now make
a photo frame using any photo that you have in your library. Use the
Frame-maker guided edit to quickly create a custom frame to outline your
photos. Share and load frames into My Frames.
Access this feature in Guided >> Special Edits
>> Frame Creator
1 Open a suitable image in the Editor to be used as a photo
frame.
2 Select from one of four selection tools:
Quick
Selection
Selection
Brush
Magic Wand
Polygonal
Lasso
You may
add another image to the frame by clicking the drop zone, or double-clicking
this frame in the Frame panel (after it has been created).
3 Use Tool
options pane to tweak Selection tool parameters. Create a selection on the
image canvas.
4 Click
Create Frame, provide a name for the frame, and create a frame from your
selection.
5 Click Save
Frame. When you click Save Frame, the newly-created frame will be available in
Expert Mode >> Graphics Panel >> Frames.
Use the
right panel to find your frame. From the drop-downs select By Type > Frames
> My Frames. Frames are now sorted alphabetically, so that you can quickly
find the one you are looking for.
6 Do one of
the following:
Click Done
Refine the
frame further by modifying it in Expert mode. Click Continue in Expert.
Import a shared frame
Not only can
you now create fun, customized frames that speak your story, you can also
import frames that other Elements users have created and shared on-line.
Imported frames
can be loaded in a few simple steps:
1 In
Photoshop Elements, switch to Expert mode.
2 Click
Graphics, and then from the fly-out menu, click Add Frame.
3 Select the
PSD file that represents the frame you are importing, and then click Load.
View an imported frame
1 In Expert
mode, click Graphics.
2 From the
drop-downs available in the right panel, choose By Type >> Frames >>
My Frames.

Samples

 |
| Before |
After
 | ||||
| Before |
After

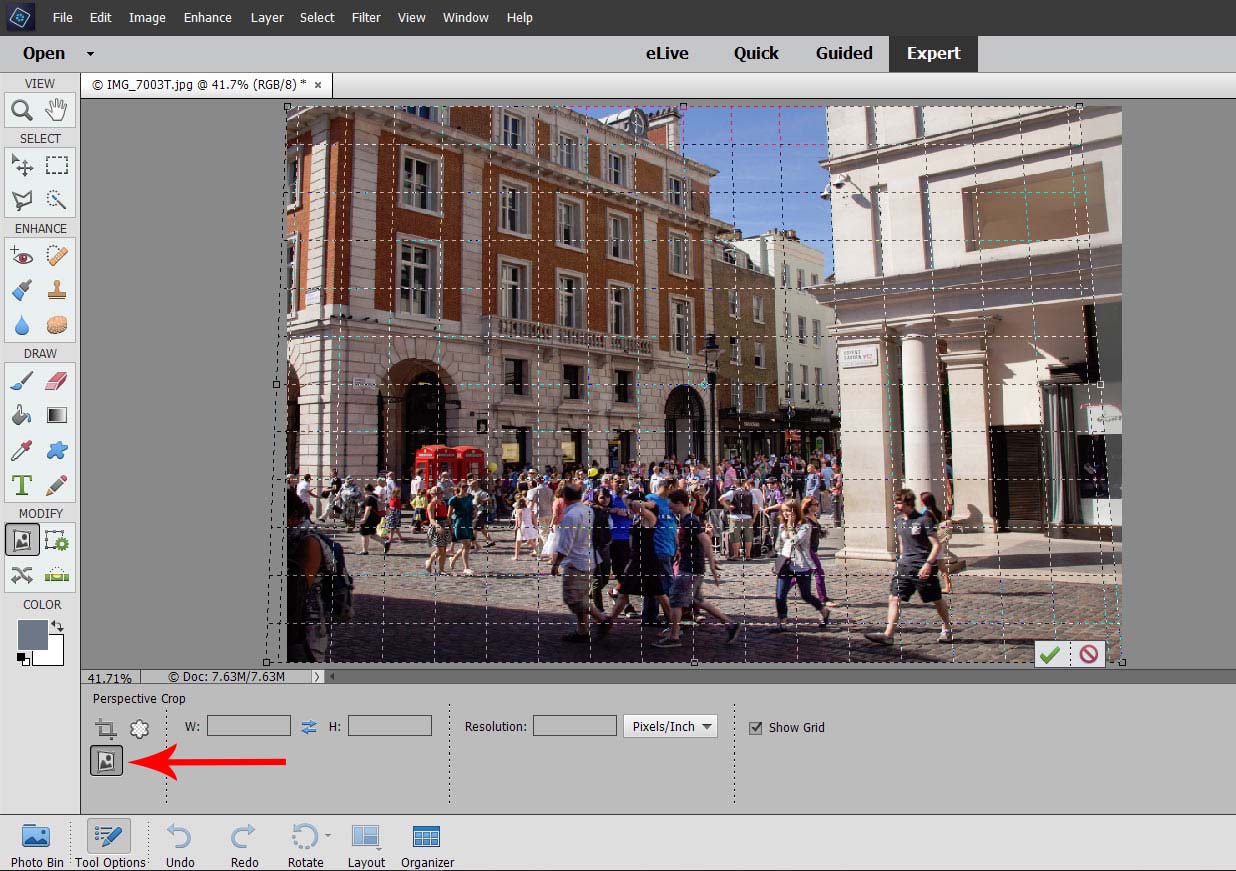
The Perspective Crop
tool lets you transform the perspective in an image while cropping.
Use the Perspective Crop
tool when working with images that contain keystone distortion. Keystone
distortion occurs when an object or building is photographed from an angle
rather than from a straight on view. For example, if you take a picture of a
tall building from ground level, the edges of the building appear closer to
each other at the top than they do at the bottom.
Using
the Perspective Crop tool:
1. To correct image perspective, select the Perspective Crop tool
nested with Crop Tool in Expert Mode. You will find it in the tool options.
2.
Draw a marquee over the image and a grid will appear. Match the
edges of the grid lines to the parts of the image that need correcting by
dragging the corner handles of the marquee. See example (before and after) where
the building on the right is leaning to the left.
3. Press Enter (Windows) or Return (Mac OS) or Click on the Green
Check-Mark Button to complete the perspective crop.
It may be necessary to
switch to the regular crop tool to remove any blank pixels left behind.
(Optionally) you
can use the tool to crop to a specific Width, Height and/or Resolution of the
Final Cropped image. You can also toggle the grid on and off to use it as a
guide while correcting an image.
 |
| Before |
 |
| After |
 |
| Expert Mode Workspace |
Adjust Facial Features


I think I prefer the tabs for Light, Color, Clariy and fx. The
thumbnails provide a good representation. The one click smart
fix seems to add a lot of cooling while pumping up the shaddows, although the results vary from image
to image; sometimes adding a blue tint and sometimes removing it where
the original is predominantly blue. Having said that, I have some night
time images and smart fix really makes them pop. But most of the time I
would use the Editor: Enhance >> Auto Smart Fix as I find the
results more pleasing. Still it’s good to have options.

Enhancements and Fixes (APD)
The new Adjust Facial Features workflow uses face-aware
technology to identify and adjust facial characteristics. You can now easily
retouch portraits and other images of people. You can take a portrait picture
and adjust facial features like the jaw, nose, lips, and eyes using simple
sliders to increase or decrease an effect.


Using the Adjust Facial Features workflow:
1 Open an image in the Elements Editor, and from the menu
bar choose:
Enhance >> Adjust Facial Features.
2 Use any of the sliders to change modify facial
characteristics for the selected face – highlighted with a blue circle.
3 Click each tab (lips, eyes etc.) to expand the slider options.
4 Click the Before /After toggle switch to compare the
current state of the photo with the original photo.
5 Click OK and save.
Other Enhancements & Fixes
Content-Aware Move

While using
the Content-Aware Move tool, you can now adjust the scale and rotation of the:
-Object you
are moving, or,
-Area that
you are extending
The box “Transform
on Drop” is checked by default.
After
dragging and dropping your selection, and before clicking the green check-mark,
a bounding box now gives the options to rotate, scale and skew.
Smart Objects - preference
The Healing Brush and the Spot Healing brush have been enhanced for better performance.
ELEMENTS ORGANIZER
Smart Tags
In the Organizer, Adobe has introduced Smart Tags, based
upon their preview technology seen in Lightroom Mobile Web. In PSE15
this is taken one step further adding greater functionality to the
catalog. This technology cleverly uses composition
and other information to automatically tag images, vastly increasing
search options, even where users have added no keywords of their own.
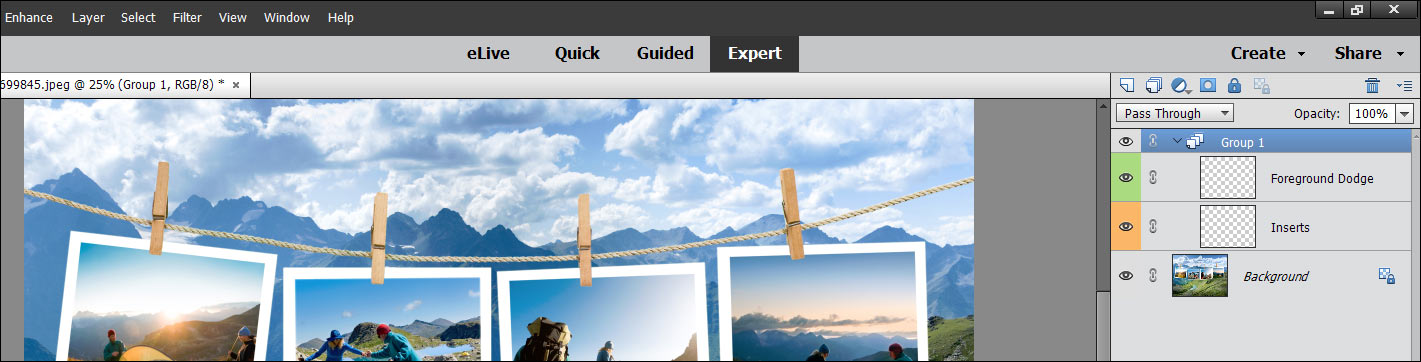
Layer
Groups
From Photoshop CC, grouping layers helps
organize and editing of the different components of your projects, and keeps
your Layers panel uncluttered.
1. Select multiple
layers in the Layers panel.
2. Do one of the
following:
Choose Layer >> Group
Layers.
Layer >> New >>
Group from Layers
Alt-drag (Windows) or
Option-drag (Mac OS) layers to the layer
group icon in the layers panel.
3. To Ungroup the
layers, select the group and choose
Layer >> Ungroup Layers.
Layer
Color Coding
Color coding layers and
groups helps you locate related layers in the Layers
panel. Simply right-click the layer o rgroup and select a color.
The Color option for
layers is available in the New Layer and the New Group dialogs.
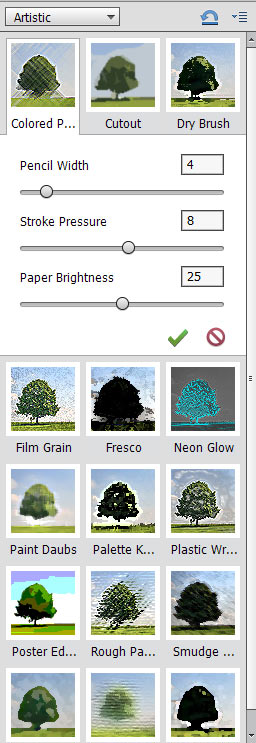
Filters Enhanced
In previous versions of
Photoshop Elements, the filters inside the Effects panel were
single-click-and-apply. You could not vary or modify the intensity of the
filters effect applied to the image. In Photoshop Elements 15:
Some filters have an
Advanced Options (for example, Colored Pencil). The Advanced tweaks enable
certain further modifications to the filter effect applied.
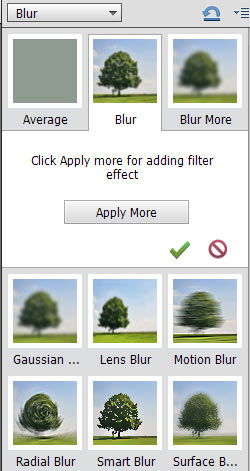
Some filters have an Apply More button (for
example, Blur).

Frames and Backgrounds
Photoshop Elements 15
now includes brand new frames and backgrounds.
51 new backgrounds
52 new frames
To
choose a new graphic:
1. In Expert mode,
select the Graphics panel.
2. From the first
drop-down select a type of graphic that you want to see.
3. From the second
drop-down, select whether you want to see backgrounds or frames.
Note: The new backgrounds and frames are displayed at the top of the
list.
The Preferences dialog
(Preferences >> General tab) now has a checkbox that
disables automatic creation of Smart Objects when you
place or drag images from the photo bin.
Tool Performance
The Healing Brush and the Spot Healing brush have been enhanced for better performance.
ELEMENTS ORGANIZER
Smart Tags
I typed a couple of generic words such as Food or Ocean and was
impressed with the results from this new technology. After importing new images or converting a
catalog from an earlier version of Elements, it’s best to let the indexing
finish, for maximum efficiency.
At present, smart tagging only works with the English
language.
 |
| Click to enlarge |
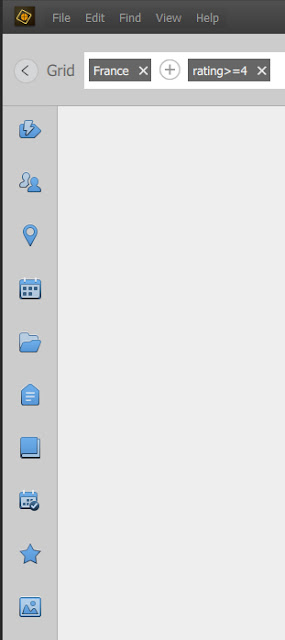
Search Revamped
Use the new search button to find media or use the keyboard
short cut to find items quickly (Ctrl+F or Cmd+F)
The new search bar lets you build multiple criteria simply
by clicking icons displayed in blue on the left or by typing words or phrases.
For example, keywords can be used in conjunction with smart tags or any other criteria.

Instant Fix Enhanced
The new instant fix function in Organizer has been moved
left on the bottom options bar. It can now be found next to the Editor Button
which seems more logical.
The filter options appear on the right as a series of blue
icons.
Multi-image Instant Fix
Batch processing is now possible using the instant fix filters.
In multi-image view, edits are applied to all the selected photos.
Opening a filter displays a series of thumbnails which can
be clicked to apply an instant “look” or the slider can be dragged up or down
from a central starting point.
 |
| Click to enlarge |
The instant fix options do provide for big changes e.g. in color
saturation or de-saturation. So I don’t think the smart fix button is out of
place.
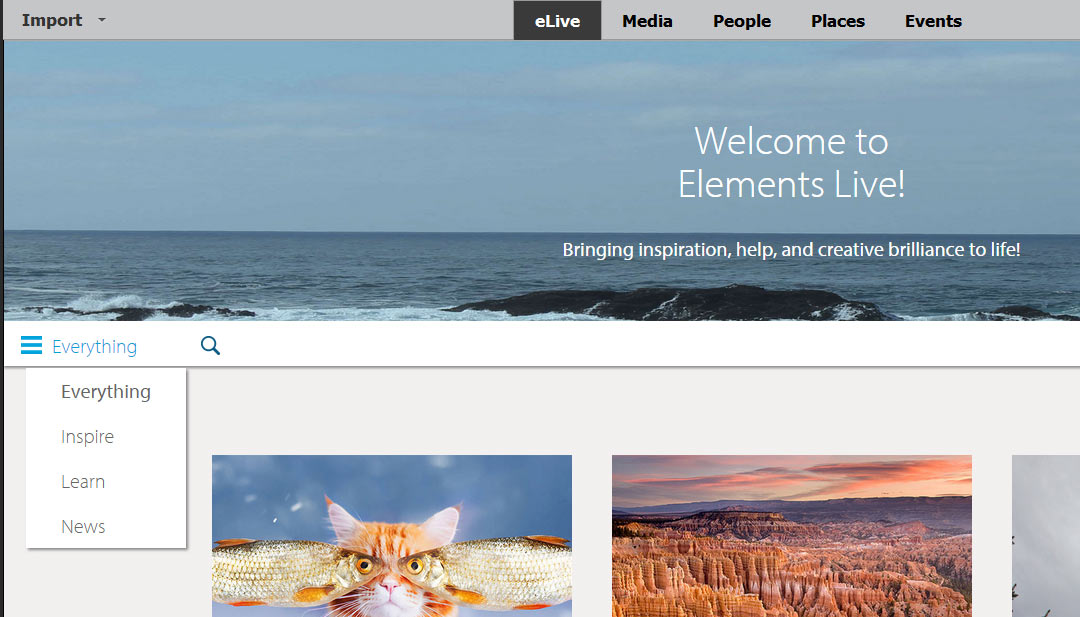
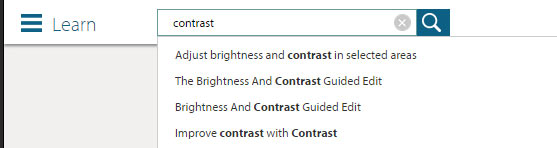
eLive Search
Inspirational, help, and troubleshooting guides are
regularly added or updated in eLive mode. PSE15 lets you search for eLive
content, documentation, and troubleshooting knowledgebase articles from within
the eLive mode.
Note: eLive is only available for installations in the English language.
Note: eLive is only available for installations in the English language.
Simply type a word or phrase to bring up suggested links.
Note: eLive Search is available in both Photoshop
Elements Editor and Elements Organizer.
Watch Folders Available on Mac OS
In previous versions,
Watch folders were available only on Windows. In PSE15, Watch folders are
available on Mac OS as well.
Elements
Organizer automatically detects when new media files are added to a Watch
folder, and prompts you to import them to a catalog.
Automatic addition of
Cloud storage folders
The
Cloud-based storage folders linked to your computers and devices are now
automatically detected and marked as Watched folders.
The Pictures folder is included by default. The
supported cloud-based storage services are:
DropBox
OneDrive
Google
Photos
Enhanced User Interface
When new
media files are detected in a Watch folder, the new Import Media dialog is now
displayed. You can easily import media files from within this dialog. The
dialog also displays the current list of the Watch folders. You can add or
remove watch folders as preferred.
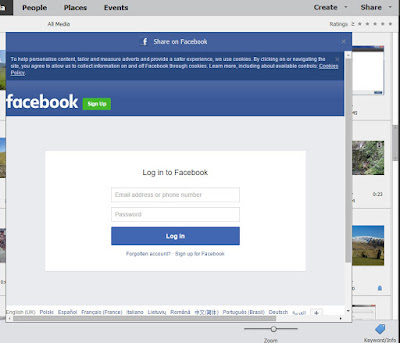
Share to Facebook Enhanced Workflow
As part of the enhancements to the Share workflow, this PR
drop includes an updated Facebook share workflow.

To access the Facebook share feature, select the media files
you want to share, and then select:
Share >> Facebook
The following enhancements have been made to the Facebook
share workflow:
Log in from within the Share dialog - in the previous
version, to share your media files on Facebook, you had to log in to Facebook
from outside Elements Organizer (for example from a browser). In this release,
you can log in to Facebook from within the login dialog in Elements Organizer.
Share multiple images at a time - you can select and share
multiple images at a time. You can share these images:
-to your timeline
-to a new or existing album
Share a video - you can now share videos to Facebook.
Note the videos can only be shared one at a time.
Tagging Facebook friends - you can now tag your Facebook
friends in your photos. You can tag one or more friends at a time.
Sharing with different privacy levels - you can share your
media files with any of the following privacy levels:
-Public
-Friends
-Only me
Touch-based Editing
Elements Organizer is now touch-friendly!
Organize photos with your fingertips. Now, you can simply tap to find,
sort,
and enhance your photos in your touch-screen devices. The new Instant
Fix
mode in Element Organizer also supports touch, putting all those cool
effects and edits literally at your fingertips!
Enhancements and Fixes (APD)
The fix for
the Adobe Photoshop Downloader will help Macs users.
Since the release
of Photoshop Elements 14, a common issue was the Adobe Photoshop Downloader
(APD) being unable to detect iOS/PTP/MTP based devices on Mac OS 10.11.x. Apple
completely re-designed the USB stack in El Capitan and many devices became unrecognizable.
This issue has now been fixed, and devices will be recognized in Elements
Organizer without any issues.
No comments:
Post a Comment
Note: only a member of this blog may post a comment.